
Introduction
Stone veneer has become a popular choice for homeowners looking to enhance the aesthetic appeal of their properties. With its versatility, durability, and cost-effectiveness, stone veneer offers a practical and stylish solution for creating stunning architectural features both indoors and outdoors. In this comprehensive guide, we will delve into the world of stone veneer installation, exploring the various types of stone veneer available, the tools and materials needed for installation, the step-by-step process of installation, and tips for maintaining and caring for your stone veneer surfaces.
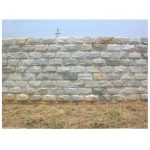
Types of Stone Veneer
Before embarking on a stone veneer installation project, it is essential to understand the different types of stone veneer available in the market. The most common types of stone veneer include:
1. Natural Stone Veneer: Natural stone veneer is made from real stone that is quarried and cut into thin slices. It offers the authentic beauty and texture of natural stone, making it a popular choice for those looking for a high-end finish.
2. Manufactured Stone Veneer: Manufactured stone veneer, also known as faux stone or cultured stone, is made from a mixture of cement, aggregates, and pigments that are molded and colored to mimic the look of natural stone. Manufactured stone veneer is lightweight, easy to install, and more affordable than natural stone veneer.
3. Brick Veneer: Brick veneer is a type of stone veneer that replicates the appearance of traditional brick. It is available in a variety of colors and textures, making it a versatile option for both interior and exterior applications.
Tools and Materials Needed for Stone Veneer Installation
To successfully install stone veneer, you will need the following tools and materials:
Tools:
- Masonry trowel
- Notched trowel
- Grout float
- Circular saw with diamond blade
- Level
- Tape measure
- Safety goggles
- Gloves
- Mixing paddle
- Caulking gun
Materials:
- Stone veneer panels or pieces
- Mortar mix
- Metal lath
- Nails or screws
- Metal lath screws
- Grout
- Sealer
It is crucial to ensure that you have all the necessary tools and materials before starting your stone veneer installation project to avoid any delays or issues during the process.
Step-by-Step Stone Veneer Installation Process
Now that you have the tools and materials ready, let's walk through the step-by-step process of installing stone veneer:
1. Prepare the Surface: The first step in the installation process is to prepare the surface where you will be applying the stone veneer. Ensure that the surface is clean, dry, and free of any dust, dirt, or debris.
2. Install Metal Lath: Next, attach metal lath to the surface using nails or screws. The metal lath provides a secure base for the stone veneer to adhere to and helps prevent moisture damage.
3. Mix Mortar: Mix the mortar according to the manufacturer's instructions. The mortar should have a thick, peanut butter-like consistency for optimal adhesion.
4. Apply Mortar: Using a masonry trowel, apply a layer of mortar to the back of the stone veneer panel or piece. Press the stone veneer firmly onto the surface, ensuring that it is level and properly aligned.
5. Secure Stone Veneer: Use metal lath screws to secure the stone veneer in place. Repeat this process for each stone veneer panel or piece, ensuring that there is a consistent gap between each piece for grout.
6. Grout Joints: Once the stone veneer is in place, use a grout float to fill the gaps between the stones with grout. Smooth out the grout with the float and wipe away any excess grout with a damp sponge.
7. Seal the Stone Veneer: Allow the grout to dry completely before sealing the stone veneer with a stone sealer. The sealer helps protect the stone veneer from water damage and staining, ensuring its longevity and durability.
Large format mosaic tile for spacious areas for Maintaining Stone Veneer Surfaces
To keep your stone veneer surfaces looking beautiful and well-maintained, consider the following maintenance tips:
1. Regular Cleaning: Clean your stone veneer surfaces regularly with a mild detergent and water to remove dirt, dust, and debris. Avoid using harsh chemicals or abrasive cleaners that can damage the stone veneer.
2. Sealing: Reapply a stone sealer to your stone veneer surfaces every few years to maintain their protective barrier and prevent moisture damage.
3. Avoid Harsh Weather: If your stone veneer is installed outdoors, protect it from harsh weather conditions such as extreme heat, cold, or moisture to prevent damage and deterioration.
4. Repair Damage Promptly: If you notice any cracks, chips, or other damage to your stone veneer surfaces, repair them promptly to prevent further issues and maintain the integrity of the installation.
Conclusion
Stone veneer installation is a rewarding and transformative process that can enhance the beauty and value of your property. By understanding the different types of stone veneer available, having the right tools and materials, following the step-by-step installation process, and implementing proper maintenance practices, you can create stunning architectural features that will stand the test of time. Whether you are looking to update your interior fireplace or add a touch of elegance to your exterior walls, stone veneer installation offers endless possibilities for creating a stylish and sophisticated space.